有些主题可能并没有自带这个功能,这里简单介绍一下如何使用简单几步使主题支持该功能。
效果图


原理
每次提交链接到社交平台上,它们在后台都会对链接对应的网页进行分析,读取元数据。这时名叫Open Graph的元数据就起作用了,那什么是Open Graph呢?
Open Graph Protocol(开放图谱协议),简称 OG 协议或 OGP。它是 Facebook 在 2010 年 F8 开发者大会公布的一种网页元信息(Meta Information)标记协议,属于 Meta Tag (Meta 标签)的范畴,是一种为社交分享而生的 Meta 标签。
为了让信息内容加速流动和准确呈现,Facebook 早年极力推动这个协议,到目前几乎主流的社交媒体网站都支持 OG 协议。包括 Twitter、Pinterest、LinkedIn 和 Google+ 都可以识别 OG 协议。虽然 Twitter 也有自家的 Twitter Cards 协议,但是 Twitter 只要发现网页上没有使用自家的协议,就会用 OG 协议代替。国内的百度、360 搜索、微博、微信、人人网等也支持该协议。
引用自https://zhuanlan.zhihu.com/p/36072541
开始使用
也就是说,要想让Twitter、facebook等SNS平台读取到你网页的信息并生成卡片,并不是让他们自己去爬取你网页的标题与主要内容,而是网页这一边通过<head>里的元数据(Matadata)告诉他们页面的标题与主要内容。
所以,确保你Hexo生成的页面<head>里拥有以下内容,即可使你在社交网站分享页面链接的时候自动生成相应卡片:
1
2
3
4
5
6
7
8
9
10
11
12
13
14
15
16
17
|
<meta name="twitter:image:src" content="头图文件"/>
<meta name="twitter:creator" content="@作者推特id"/>
<meta name="twitter:card" content="summary_large_image"/>
<meta name="twitter:title" content="页面标题"/>
<meta name="twitter:description" content="页面描述"/>
<meta property="og:image" content="头图文件"/>
<meta property="og:image:alt" content="页面描述(图片的替代文本)"/>
<meta property="og:image:width" content="1200"/>
<meta property="og:image:height" content="600"/>
<meta property="og:site_name" content="网站名称"/>
<meta property="og:type" content="object"/>
<meta property="og:title" content="页面标题"/>
<meta property="og:description" content="页面描述"/>
|
举个例子,在某个页面的<head>里有下列元数据:
1
2
3
4
5
6
7
8
9
10
11
12
13
14
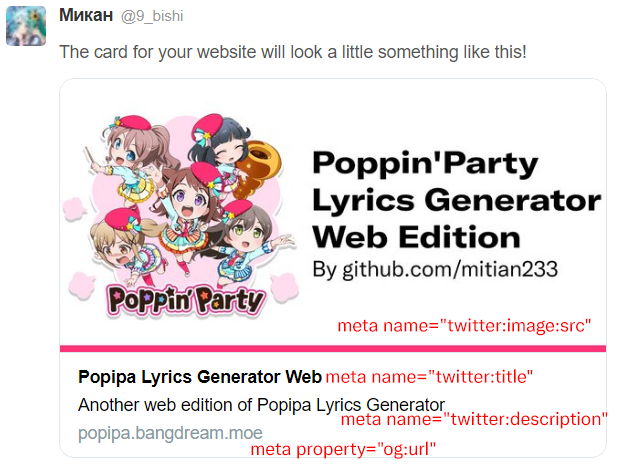
| <meta name="twitter:image:src" content="http://popipa.bangdream.moe/img/ident.png"/>
<meta name="twitter:site" content="@9_bishi"/>
<meta name="twitter:card" content="summary_large_image"/>
<meta name="twitter:title" content="Popipa Lyrics Generator Web"/>
<meta name="twitter:description" content="Another web edition of Popipa Lyrics Generator"/>
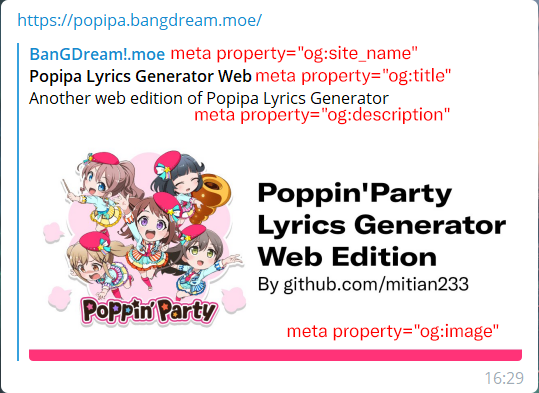
<meta property="og:image" content="http://popipa.bangdream.moe/img/ident.png"/>
<meta property="og:image:alt" content="Another web edition of Popipa Lyrics Generator"/>
<meta property="og:image:width" content="1200"/>
<meta property="og:image:height" content="600"/>
<meta property="og:site_name" content="BanGDream!.moe"/>
<meta property="og:type" content="object"/>
<meta property="og:title" content="Popipa Lyrics Generator Web"/>
<meta property="og:url" content="https://popipa.bangdream.moe/"/>
<meta property="og:description" content="Another web edition of Popipa Lyrics Generator"/>
|
那么你看到在Twitter上分享的卡片则是这样的:

而在Telegram上看到的分享卡片则是这样的:

给Hexo资深用户
如果你是Hexo老用户或者主题开发者,且知悉Hexo生成网页的原理,可以跳过浏览下面这些内容,将以上代码直接拷贝进主题文件并替换相应变量或放在相应函数里之后发布使用。
如果你不是,仔细看接下来的内容。
给Hexo新人
hexo生成页面时,使用主题文件里的各种ejs拼接起网页的各个成分。这些ejs文件通常会放在主题文件夹内的layout文件夹下。看名字就知道了,这个文件夹是用来存放控制主题生成html的布局的文件的。
如果我们需要在生成网页的<head>里插入元数据,编辑生成后的html文件是不可能的,所以需要在head.ejs里编辑,指导Hexo在生成的时候自动添加我们想要的内容。
在动手之前,请学习ejs的if else语法并清楚你使用主题的变量结构。
在主题的head.ejs内添加以下内容:
变量声明
theme.twitterpic这个变量是接下来添加的,而page_title()、description等变量因主题而异。这篇文章使用了博客主题diaspora作为例子,若您博客的主题不是diaspora,则不能直接使用,需要替换变量名称或者添加元素id。
1
2
3
4
5
6
7
8
9
10
11
12
13
| <% if(theme.twitterpic.enable){ %><meta name="twitter:image:src" content="<%- url_for(theme.twitterpic.src) %>"/><%}%>
<% if(theme.twitterpic.enable){ %><meta name="twitter:creator" content="@<%=theme.twitterpic.creatorid%>"/><%}%>
<% if(theme.twitterpic.enable){ %><meta name="twitter:card" content="summary_large_image"/><%} else {%><meta name="twitter:card" content="summary"/><%}%>
<meta name="twitter:title" content="<%= page_title() %>"/>
<% if (description) { %><meta name="twitter:description" content="<%= description %>"/><%}%>
<% if(theme.twitterpic.enable){ %><meta property="og:image" content="<%- url_for(theme.twitterpic.src) %>"/><%}%>
<% if (description && theme.twitterpic.enable) { %><meta property="og:image:alt" content="<%= description %>"/><% } %>
<% if(theme.twitterpic.enable){ %><meta property="og:image:width" content="1200"/><% } %>
<% if(theme.twitterpic.enable){ %><meta property="og:image:height" content="600"/><% } %>
<meta property="og:site_name" content="<%= config.title %>"/>
<meta property="og:type" content="object"/>
<meta property="og:title" content="<%= page_title() %>"/>
<% if (description) { %><meta property="og:description" content="<%= description %>"/><%}%>
|
然后在主题的_config.yml内添加以下内容,并根据需要调整配置:
!这一步非常关键!
1
2
3
4
5
|
twitterpic:
enable: false
src: https://bangdream.moe/img/ident.png
creatorid: yourtwitteridhere
|
大功告成
发布网页之后,你可以在这里预览效果。
Telegram的卡片预览可能不会立即更新,你需要私聊@WebpageBot发送链接以手动更新链接卡片。
引申阅读


